The Daily Skein

All the craft that’s fit to make.

Make a Clock! April 5, 2011

Filed under: Patterns,Sewing Projects — Cailyn @ 5:48 pm
Tags: ,

I had some time between sock designs recently and I didn’t want to start a new knitting project before my yarn arrived for my Tangled sock.  So, I decided to make a clock with an embroidered face!


IMG_5069

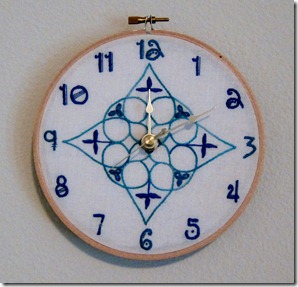
Pretty, yes?  I think I’ll put it in my guest room.  And so easy to make.  Here, I’ll show you how:


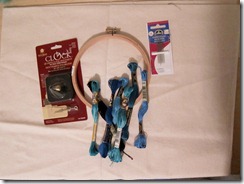
Supplies

  • Wooden embroidery hoop
  • Fabric to embroider on
  • Embroidery floss
  • Needle
  • Cardboard or foamcore
  • Glue
  • 1 1/4-inch clock movement kit (found online or at general craft stores)
 

IMG_5025


I used a 6 inch embroidery hoop for my clock.  Use a bigger or small hoop for a bigger/smaller clock. 


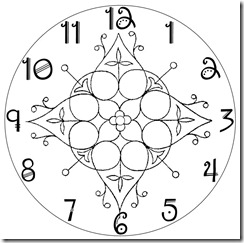
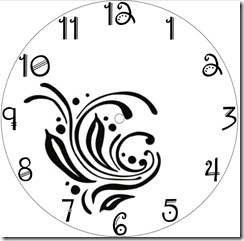
Design your clock face.  I used MS Publisher to lay it all out but you can do it by hand too.  I made a 6 inch circle, then placed a free embroidery design in the center and found a fun font for the numbers.  Here are two of my finalists; I chose the one on the right, although I made some minor changes to it as I embroidered.


Clock Face  Clock Face2


Transfer your design to your fabric however you’d like.  I used the window as a light box and traced the design on to some muslin.  Although I didn’t actually use the wooden hoop while I was stitching.  I can only embroider using the seafoam green plastic hoop that I got as a kid when I did cross stitching.  I can’t get any other hoop to work for me- they’re always too awkward.  Early conditioning, I suppose!


IMG_5060


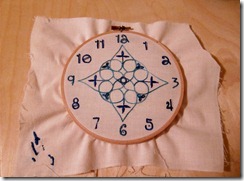
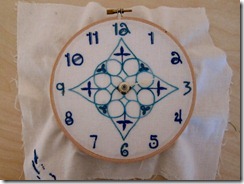
Embroider the clock face.  I marked the center hole for the clock mechanism and surrounded it with a buttonhole stitch- the clock mechanism is about 5/16 inch diameter.  I satin stitched the numbers with three strands of floss.  The little accents are either a single stitch with one strand or a French knot with three strands.  The main design is done with three strands of floss in stem stitch with some lazy daisies and satin stitch for accents.  Only the lazy daisies are done with a full six strands of floss.


Once that’s done, take care of the fabric like you would any embroidery (a gentle handwash, maybe a light pressing, what have you).  Hopefully however you transferred your design comes off easier than mine did!  Make sure it’s dried before putting the clock together.


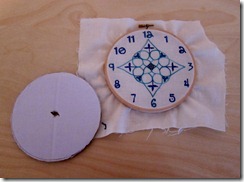
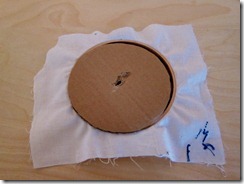
Use the inner circle of your wooden hoop and trace the inside of it on the cardboard or thin foamcore.  I used some white cardboard.  Make sure that whatever you use doesn’t show through your fabric.  Cut out the circle and test to see that it fits snugly in the inner circle.  Trim or cut another one if it doesn’t.  Find the center and cut a hole for the clock mechanism to go through.  You can also do this part later, cutting through both the fabric and backing, but I think that’s more annoying.


IMG_5061


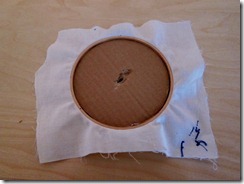
Place the fabric back in the wooden hoop and tension to your liking.  Place the backing piece into the inner circle, pressing it up against the fabric.  Once everything’s perfect, you can trim off the extra fabric with scissors or an X-acto knife and use a little glue to keep the edges from fraying or tack them down on the wrong side of the clock.


IMG_5063  IMG_5064


Assemble the clock hands according to the clock maker’s instructions.  (As you can see, I assembled the clock then trimmed my extra fabric.)


IMG_5066


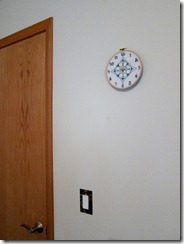
Put in a battery, hang on the wall, and enjoy!
 

IMG_5068


Sketchbook Cover March 25, 2010

Filed under: Sewing Projects — Cailyn @ 7:53 pm
Tags:

While I futz around with about a hundred swatches in ten different yarns and three needle sizes for a sock design that I will probably abandon, I’ll share with you a recently finished sewing project.


My friend, Christina, is a great artist.  I’ve loved her work since we were in high school and were President and VP of the German Club together.  Or maybe I was Treasurer.  I can’t remember exactly, but I know she was President.  Good times.  She asked if someone could make a cover for her sketchbook with pockets and a pen holder and I volunteered, since I am pretty good at sewing square-shaped objects.  (And if you don’t want the dirty details of how this was made, Christina, turn away now!)


This is the finished sketchbook.


104_5051    104_5052


The main material is cotton canvas.  We bought the Japanese printed canvas on Etsy.  There’s some beautiful printed canvas on Etsy!  My fabric stash was dangerously near to exponential expansion while I worked on this.  I figured that I could buy the black canvas at the local Joann’s.  What were the chances that the Joann’s and the local fabric chain were both sold out of black canvas?  Isn’t black canvas the “white bread” of fabric?  Shouldn’t there be piles of bolts laying around in the back, so many bolts that the true number of them is unknown?


Well, in any case, I had to search far and wide for some black canvas and I was not happy about it.  Seemed unfair.  It wasn’t like I was looking for green elastic.  Oh wait, I was!  …But that I found easily on Etsy.  I love Etsy so much.  Next time, I buy the “easy to find locally” fabric on there too.


Enough about the supplies.  Here’s a tour through the finished project.


Inside, front cover.  Two small business card pockets and one 3×5 pocket.  And the large black pocket, as well as anything you can shove in between the cover and the… cover.  The card slots were a big problem for me and took me a lot of time.  I made many, many test pockets.  The room is still littered with test pockets.  I wanted to keep the bulk of the pockets down as much as possible so that the book could close flat or close to, so they’re not lined.  Essentially, they are zipper pockets without the zippers or lining.  I’m not entirely happy with the way they came out and I’d probably do them differently if I made another cover, but I do like the final layout of the slots which was only possible with this method.  They also, despite meticulous measuring, did not come out straight.  I blame the black canvas; it distorted easily.

 104_5055


Inside, back cover.  Basically, the same deal as above, but only one 4×6 pocket.  Much simpler, but no more straight than the front. 

104_5056 


I sewed everything together into one long rectangle, then folded the left and right over to make the insides.  I had sandwiched the elastic in with the other fabrics but, stupidly, I measured it’s placement 2” in from the right of the rectangle- which of course was not 2” in from the right edge of the book cover as intended, but instead 2” in from the left edge of the inside back cover.  Er- the left edge of the picture above, is what I mean.  This put the elastic right in the middle of the book when closed, which was unattractive and pretty useless in terms of keeping the book closed.  To save time and sanity, I cut the elastic carefully so that it receded back into the cover.  Then I carefully triple-, quadruple-, quintuple-checked the measurements and sandwiched the elastic in when I folded over the sides, which put the elastic in mostly the right place.


104_5070   104_5059


On the cover, there’s a large black pocket on the front and back.  The spine has two grommets (my first grommets, so much fun!) which house a green ribbon bookmark.  You can see the tails peeking out of the bottom of the book.  There’s also a line of topstitching running down the middle of the spine.


And, finally, there’s the pen holder.  This was also a challenge, because I was under a “no velcro” restriction.  Snaps were the obvious choice, but short of installing the snaps into the elastic (not a very elegant solution), I couldn’t think of a way to keep the pen holder from sliding around when the book was in motion.  I finally thought about mitten clips, like these.  Install one in the back and use snaps for added security and aesthetics.  Unfortunately, the store didn’t have any mitten clips, but they did have “fashion fit clips” that women use to pull in dresses that are too big in the waist.  Which, honestly, are the same as the mitten clips with slightly different styling.  I wanted the flatter mitten clips, but by this point in the project I was unwilling to wait for an online order; I wanted it to be done.  (This was also about the time that I realized the Knitty deadline was so close.)  So, I settled for the rounder fashion clips, snipped off the extra material with heavy-duty cutters from my chainmaille days, and set to work attaching it to the pen holder.


Since I don’t have any pictures of that process, let’s say it went smoothly and easily.  You can’t prove otherwise- there’s no evidence.  It was nothing a butt-ton of glue couldn’t fix, anyway.  This was also my first time using prong snaps, the kind you install with a hammer.  Very fun!  I need to find more projects that use snaps and grommets.  Or maybe I just need to wield a hammer more often.  Sadly, since the clip made the holder not-so-flat, I had to do the top stitching by hand.  I hate hand sewing with a passion usually reserved for cleaning grout.  So I don’t do it very often and I just want to get it over with when I do.  The front looks fine, but the back leaves a little to be desired.  I thought about top stitching the straps too, but… refer back to my original statement.


104_5064   104_5061  104_5065  


Oddly enough, this hatred of hand sewing does not apply to sewing knitted garments.  I thought it would, which is why I avoided sweaters for so long, but I actually kind of enjoyed sewing up the CPH.  I know, it’s weird.


Overall, I’m very pleased with how the sketchbook cover turned out.  If only I carried around a book like this, I’d make one for myself!


Spy Games December 17, 2009

Filed under: Knitting Projects,Musings,Sewing Projects — Cailyn @ 11:50 pm
Tags: , , , , , ,

I would like to tell you that my mysterious long absence was due to a secret mission for the CIA.  Sadly, there was no spying or espionage involved.  I’ve been very busy, mostly with cleaning and organizing and not knitting.  I’m not really enjoying the knitting project that I’m working on right now but I am determined to finish it.  I’m sure you know how that feels- it makes the project drag on so much longer than it should even if you’re knitting just as fast as normal.  I have also been weaning off my antidepressant and, well, it hasn’t gone well.  I’m tired all the time and irritable and I haven’t felt much like writing.  I’ve been working on this post for four days!  It would have been much more interesting if I were a secret agent.


While I wasn’t spying for the CIA (wink wink nudge nudge), I finished plying this handspun:


102_4630     102_4846  102_4849  


I bought the fiber right after my spinning class at the Sock Summit.  It’s dyed with real indigo.  Have I written about this before?  I can’t remember.  It’s 100% Blue Faced Leicester from a Verb for Keeping Warm.  The woman who sold me the fiber at the Summit was really helpful and friendly and I’ll be buying from them again!  I spun this on the handmade bottom-whorl spindle from the Sock Summit too, using a mostly short-draw worsted style of spinning.  I r.nsay mostly because this is very much a beginner’s yarn and I played a little fast and loose with the fiber.  I didn’t sample the fiber and I didn’t stop very often to see if what I was spinning matched what I had already spun.  Well, it turned out mostly consistent, although some sections are almost thread-thickness.  I had originally intended to make this a three-ply yarn so I was trying to spin the singles pretty fine.  By the end, though, I decided to just make it a two-ply yarn.  I didn’t have a very consistent amount of twist in the singles and I was sure that they were over twisted.  But when I plied them, I didn’t have to put in a lot of twist to make a “balanced” yarn.  This led to some problems plying… to get the yarn to look and feel nice, I had to over-twist during plying; the “balanced” yarn has hardly any twist at all in it.  I started over-twisting about halfway through.  Maybe I’ll knit something with it… maybe it’ll just be pretty yarn to look at.


One of the bedrooms in our house has a French door with glass panels instead of a regular door.  This room is technically my studio but that hasn’t stopped me from littering the rest of the house with projects, yarn, beads, and other detritus of the crafter.  When we have multiple house guests at once, the addition of an air mattress magically turns this room into an extra guest room.  As you can imagine the glass door is a little problematic from a privacy standpoint.  Since this situation only comes up a few times a year, the usual solution is a sheet hung over the door.  Efficient but ugly to say the least.  So I grabbed some over-the-door hooks, two short curtain rods, and some fabric (on sale!) and made a curtain for the door.


It was a very simple project.  I had originally intended to make the curtain a little wider and use two different fabrics, one on each side, but then I got lazy.  Possibly because I had already worked on one very time-consuming sewing project already that day.  I simply folded the fabric in half, topstitched various parts and hung it on the door.  Somehow the bottom is crooked despite careful measurements.  I’m going to pretend that the curtain is perfectly straight and it’s the door that’s the problem.  As an added bonus, the fabric looks really cool when the light from the room is shining through it.  And yes, the curtain is just a hair short width-wise.  Again, it’s the door’s fault.


102_4885   102_4889    


Other than that, there’s been the cleaning and culling of stuff (not the stash of course, that just got a major enhancement a few days ago.)  Books and old clothes have been donated, decorations have been put up, small kitchen disasters which resulted it pot roast gravy going everywhere have been resolved.  You know, the usual holiday stuff.  Also, this strange furry object on top of my yarn has kept me from knitting too:


IMG_0252


Book Pillow April 22, 2009

Filed under: patterns,Sewing Projects — Cailyn @ 7:20 pm
Tags: , ,

This:


102_4422

is a sickness.

Yes, that is me, reading and knitting at the same time.  Am I crazy?  ADD?  There’s no cat around, so I can’t be turning into a crazy cat lady.  Elizabeth Zimmerman recommends reading and knitting at the same time to help get through those long stockinette or garter sections of a sweater.  After all, once you’ve been knitting for a little while, the modest act of making a knit stitch doesn’t really require much brain power.  We all knit while watching TV, right?


Recently, there’s been a glut (yes, I said glut) of books that I want to read.  Some of them are knitting books, like Cookie A’s book Sock Innovation or Wendy Knits’ Socks from the Toe Up.  Some of the other books are fiction and a lot of them are non-fiction about nutrition, cooking, and exercise.  I also have a glut of ideas for knitting projects.  Basically, I’ve got far too many things that I want to do than I have time for.  So I’ve started reading while knitting, especially great for when there’s nothing good on TV.  After doing a number of complicated socks for submissions, I’m designing some simpler patterns (albeit with interesting construction) which have a lot of stockinette in them.  Not to mention the languishing cardigan.


But books are hard to hold open without hands.  (Why isn’t everything spiral-bound?)  Last night, I kind of tucked the book under my extra belly and propped it up on my thigh.  The problem was, of course, that the book ended up more or less hard to see, especially with the knitting in the way.  Even when I’m not looking at it, I like to hold the project where I do when I look, which is about mid-chest.  So, I came up with a solution: the Book Pillow.

102_4421

Basically the Book Pillow is a pillow (who’d have guessed?) that has some elastic on the corners to hold the book open.  I used Lastin, which is transparent so that I can read through it in case the elastic covers some words.  It works great.  And it only took about half and hour to make.  Here’s how to make one!


Book Pillow

Supplies

  • Two pieces of fabric, each big enough to cover a lap or pillow form (I cut mine 17×11″, with a 1/2″ seam allowance)
  • Four 8″ pieces of elastic such as Lastin
  • Poly-fil stuffing or a pillow form
  • Sewing machine, pins, thread, needle


Place one piece of fabric right-side up on the table.  Take one of the elastic pieces and lay it diagonally on the fabric so that it forms a right triangle with the corner of the fabric.

102_4408 


Place the other three pieces in the same manner on the other corners.

102_4411


If you want, put a book on the fabric to check the placement of the elastic.  I moved them around so that the elastic crossed just inside the seam allowance.  I didn’t spend a lot of time making sure that the angles all matched up; I just eyeballed it.  Two pieces of my elastic are shorter than the others.

102_4410


When you’ve got the placement of the elastic where you want, carefully place the other piece of fabric right-side down on top of the one with the elastic.  Pin in place, making sure to catch the elastic in the pin so it doesn’t move around.  You don’t have to stretch the elastic, since holding the book will do that, but you can stretch is slightly if you’d like while pinning.

102_4416


Sew around all four sides, leaving a hole for turning and stuffing.  If you’re using a pillow form instead of poly-fil, leave a hole big enough to stuff the pillow inside.  When the sewing is finished, turn the pillow right side out, clip the corners, and press if desired.


Stuff the pillow with the chosen filling until it reaches the firmness you like.  I stuffed mine firm but still kind of squishy.  It needs to be stiff enough to keep the book from closing.  I tested a book on it during the stuffing stages to see which I liked best.  Once you’re done stuffing, sew up the turning hole (I like to use slip stitch).


Enjoy your new ability to read and knit at the same time!

102_4423

The book in the pictures is Real Food by Nina Planck.


YCD June 20, 2008

Filed under: patterns,Sewing Projects — Cailyn @ 11:31 pm
Tags: , ,

So, yarn hates me right now. All I want to do is to love it (and force it to contort into thousands of tiny loops) and it stabs me in the back by getting tangled, eaten by the cat, and just in general being a pain in the butt. I would like to declare a knitting hiatus… but my hands are shaking at the mere thought of having to watch the Daily Show without something to occupy them, so maybe that’s not a good idea. I’m not sure how to solve this problem, but today I spent some time sewing instead of knitting again. I still had 2 more reusable shopping bags to make today as well as a few that I want to make for someone who will remain nameless. By the time I’m done with all of them, I’ll have made 12 shopping bags in just a few weeks! That’s a lot of sewing for me. I’m planning on making myself a new knitting bag (I got some gorgeous fabric on sale) if I can face my sewing machine after all this. While taking a break from shopping bags, I made this:


The YCD– Yarn Containment Device. The idea is to keep a ball of yarn from rolling around the floor while you try to knit from it. (I have a ball winder that makes center pull balls, so for me this is mainly to keep cats from playing with the ball.) I’ve seen all kinds of ways to do this, from putting the ball in a pot by your side to making one from an old soda bottle. (Some aren’t as fancy as that one, though.) The problem with the pot and the soda bottle is that they’re not very portable. Or pretty. You can accomplish the portable with a Ziploc baggie, but that still doesn’t solve the pretty. 🙂 Hence the pretty, squishable YCD!

The YCD I made today is about a 4″ cube (it’s a little taller than it is wide, but I’m not going to go get it to measure it.) It’s just about right to fit a skein of Louet Gems Pearl, which you can see in there. It’s got a ribbon drawstring. I wanted to use a cord stop, but I’ve run out so I just tied the ribbon in a bow. The YCD has some heavy interfacing on the bottom to help it stand up, but the sides are just two layers of cotton so that they squish nicely for storage or portability.

I’m planning on making more of these; they’re a great way to use up some fabric stash! This one was pretty fast to make, too, and I was making it up as I went along! It’s not perfect yet… I’d like to use fusible interfacing on the bottom for easier placement and probably make the top a little differently. Further experiments on the specimen are required, but if you’d like to try your hand at making one of these, read on!

The 4″ Yarn Containment Device

Supplies:

  • 2 fat quarters or equivalent amount of fabric and a 3″ x 17″ piece of coordinating fabric
  • 4″ square of heavy interfacing (fusible recommended)
  • 18-20″ ribbon or cord
  • Sewing machine, iron, freezer paper (optional,) pins, sewing needle

This project uses 1/2″ seam allowances.

On freezer paper or directly on fabric, draw the shape for the Device. The Device is based on a “plus” shape that is then folded up to make the bag. I start by making the 5″ square in the center, then measuring out the side rectangles, 5″ x 4.5″ on each side. You can see in the picture that I didn’t use a big enough piece of freezer paper and had to use masking tape to tape the sides on, lol! Cut one from the outer fabric and one from the lining.

Place a ruler on the cut piece, running from one inner corner diagonally to its opposite. Draw a line about 1/2″ long along the ruler, starting from each corner. (Since that made almost no sense, I hope the pictures help.) Carefully cut along the lines just drawn. These cuts enable the bag to fold correctly for sewing. If you’ve got fusible interfacing, you should fuse it to the wrong side of the outer fabric in the center of the plus shape now. Use the cuts as a guide for centering. If you don’t have fusible interfacing, read on!


Fold the piece in half, right sides together, so that two of the sides line up and pin in place. (See why we cut those slits now?) Sew along either of the outer sides with a 1/2″ seam allowance, from the top to the end of the slit. Don’t worry if the slit doesn’t reach the stitch line or overshoots a little, you won’t be able to tell when it’s all done.


Repeat for the other 3 sides, realigning as needed, and sew the lining the same way. (Don’t leave a hole for turning!) Trim the seam allowances to 1/4″ and turn the outer fabric right side out. Leave the lining wrong side out.


Put the outer fabric into the lining, line up the top edges, and pin into place. Sew along the upper edge, leaving a 2″ gap for turning.

Turn right side out. If you’re using plain interfacing, curl the 4″ piece up a bit and shove it through the turning hole and position it correctly. Press the top edges if desired.

Take your 3″x17″ strip of fabric (or cut it now) and fold it in half width-wise (so that you now have a long 1.5″ strip.) Press. Open it up and fold one short edge down about a 1/4″ (don’t worry about the other short edge for now.) Now, fold one long edge down to the fold line. Press. Do the same on the other long side. You’ve now got a 1″ x 17″ strip.


Open up the strip you just spent so long pressing so that you can see the center line, but the two sides are still folded in. Mark a place (anywhere, really) on the strip for two button holes. Follow your sewing machine’s instructions for making button holes. This is where the drawstring will come out. The button holes will sew through 2 layers of fabric.

Put the strip on the top of the bag, overlapping the bag by about a 1/4″. Pin in place. Hide the raw end of the strip under the pressed edge of the strip. If there’s more than a 1/2″ overlap, trim the raw end. Try to line up the button holes with the center of a side. (You can see that I didn’t really do that very well…)


Topstitch around the bottom of the strip, starting just after the pressed edge of the strip. This part was a little dicey for me, but I think it worked out well enough. Slip stitch the pressed edge to the strip section beneath it. Thread the ribbon or cord through the button holes, trim off any extra, and you’re done! Throw a ball of yarn in there and get knitting!

This YCD is good for very small balls of yarn or center-pull balls that won’t move. Depending on the size of your ball, you’ll want to make the Device larger.


Creative Commons License
This work by Cailyn Meyer is licensed under a Creative Commons Attribution-Noncommercial-Share Alike 3.0 United States License.