I’ve taken a short break from knitting to work on one of my other loves, sewing. Now, sewing and I have had a rocky past. It hasn’t always been pretty. But we seem to have come to an understanding now. I don’t sew clothes. (Well, maybe a skirt now and then, but that doesn’t count.) No shirts, no pants, nada. I don’t care how “simple” the pattern is. And sewing has finally come to accept that and now enjoys helping me make cool knitting bags and toys. Two things have really made my sewing much better:
Freezer paper. This stuff is awesome. You can iron it on to your fabric, draw on it, cut through it or around it, I’ve even used it as a tear-away stablizer when I’m desperate… then you just peel it off and it doesn’t leave a residue or tear! And it’s reusable (it does lose its effectiveness after 10 uses or so.)
Blindstitch (or slipstitch, the descriptions sound very similar to me.) Why didn’t anyone ever teach me this before?? All those projects I stuffed and sewed shut with whipstitch; I shudder to think of them. I freaking love blind/slipstitch. It’s almost completely invisible and easy to do. Kind of reminds me of grafting in knitting, in a good way. I tried to make my own blindstitch tutorial, but I got very frustrated with the macro function on my camera. So while the camera sees a therapist and recovers, use these tutorials: WikiHow with pictures, or YouTube video!
Anyway, I’ve been sewing because my sister is going to have a rough wee soon, and I thought I would make her something cuddly to cheer her up. Luckily she was visiting not too long ago, so I got lots of good ideas, even though I was planning on using them for the holidays. She was admiring my big “puzzle ball” that I made a few years ago. Which is a story in itself!
My grandmother-in-law always comes to me first when she wants to give handmade gifts to the family (I love this woman!) There was a sudden outbreak of great-grandchildren one year and she asked me to make some baby toys. I made these:


They’re puzzle balls, with coordinating fat eighths as the base pieces and then a different color and texture as the top piece. There’s fuzzy blue (which looks white in the pictures,) bumpy red, ridged purple, and smooth green. Oh, and they also have bells inside. I’ve heard they were a big hit. These ones were about 5” in diameter.
I made a larger one for myself, and it’s main purpose is apparently to be thrown at some unsuspecting guest. It’s made from flannel and cotton. (There’s a picture of it at the bottom of the page.) It’s very squishy and fun, about 10” in diameter. Anyway, back to the main story. I made my sister a puzzle ball, and while I was at it, I took some pictures for a tutorial. I first learned about these balls on Craftster. Take a look at some of the really beautiful ones people made!
These balls are really cool. I like using at least two colors in my balls, one “outer” and one “inner.” There are 36 pieces of fabric, 12 outer and 24 inner, so there are lots of options!
Amish Puzzle Ball
Supplies
Fabric (cotton, flannel, anything really) The amount varies depending on the size of the ball, but I’ve found that 1/2 a yard is plenty for a 6″ ball.
Coordinating thread
Sewing machine (unless you make it really small or are really patient)
Scissors, sewing needle, pins, iron and freezer paper (optional)
Polyester stuffing (or stuffing of choice)
Cutting
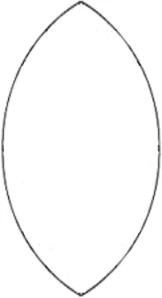
Resize the marquis shape here to your desired size (right click to save it to your computer.)
Keep in mind that there’s a ½” seam allowance, so a 7” template will be a 6” sewn shape. A 7” template makes an approximately 6 ½” diameter ball. You can make the template fatter for a ball with smaller gaps.
If you’re using freezer paper, trace your marquis onto the freezer paper. (I’ve managed to do a whole ball with one freezer paper marquis.) Cut it out.
Iron on your freezer paper template and cut out the marquis shape around the template. I fold my fabric so that I can cut 4 pieces at once, but you need really good scissors for that. Repeat until you have 36 pieces total (if making a 2-color ball, you need 24 MC pieces, and 12 CC pieces.)

Sewing
Pin two marquis pieces right sides together. Using a ½” seam allowance, sew one side of the marquis from end to end.

Take the third marquis and place it right side up on the table. Spread the sewn marquis apart and place it right side down on the third piece. Pin in place. It should look like this, but less fuzzy.


Sew one side of the marquis end to end. Sew the other side, but end about 1” short, for turning and stuffing.


Clip the seams (I like to cut them to about ¼”), turn right side out. Repeat until all pieces are sewn.
Stuff with Poly-fil to desired squishyness. Sew opening closed with blind/slipstitch. Repeat until all pieces are stuffed.


Sew two pieces together at the tips. I use blind/slipstitch to sew them together about ½” for a more solid ball in larger sizes.


Sew a third piece to the previous two to form a triangle.

Repeat until you have 4 3-piece triangles.
Sew two of the triangles together at the “point.” I use blind/slipstitch again, ½” on either side of the center.

Sew a third triangle to the two the same way.
Fold the triangles up so that the first and third touch and sew together the same way as before. You can also sew the fourth triangle on and then fold it up, but I think the first way is easier. Now you’ve got some sort of dome.


Sew the fourth triangle on in the same way, sewing each point to a point on the dome.

Finished!


