The Daily Skein

All the craft that’s fit to make.

How to Use a McMorran Balance for Fun and Profit August 9, 2011

Filed under: Spinning Tutorial — Cailyn @ 4:23 pm
Tags: , ,

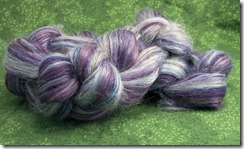
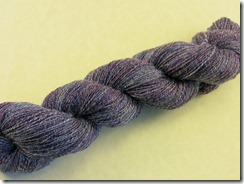
I am addicted to spinning lace yarn right now.  I don’t know why.  I’ve always been attracted to tiny crafts- I used to make little tiny sculptures from polymer clay.  Before that, I would “miniaturize” anything I learned, like “god’s eyes” (I think I was about 8 when I learned that one).  Once I got the hang of making one with popsicle sticks and worsted yarn, I started making them with toothpicks and embroidery floss.  So I guess it was really just a matter of time before I found the tiny singles of laceweight.  Before I left for Sock Summit, I finished up this pretty skein.


115_5643


It’s spun from a 70% merino/30% silk blend that I bought a few years back, one of my first fiber purchases!


Weaving Works Merino-Silk  115_5646


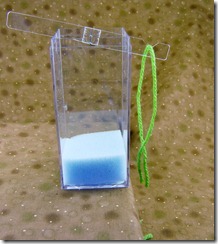
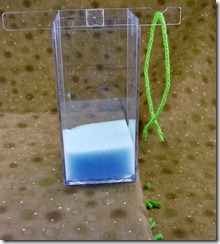
I don’t knit much lace, though, so I offered this skein to a friend who loves purple.  Since I wanted to know how much I was giving her, I pulled out my McMorran balance.  A McMorran balance is a nice, inexpensive little piece of equipment made from, basically, an acrylic box with some slots in it and an acrylic arm that wobbles.  The magic is in the calibration.  It’s calibrated to measure 1/100th of a pound.  (Metric versions can be purchased if you’re not down with the inches and ounces.)  Here’s what I did to measure my handspun (using some green Cascade 220 as the yarn, because lace yarn doesn’t show up well in photos):


115_5647


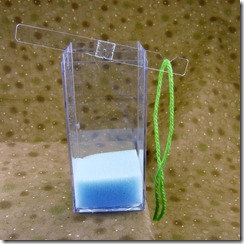
Here’s the McMorran balance sitting on the edge of a book.  You’ll see why it’s on a book shortly.  See how the notched part of the arm is tilted up?  That means the weight of the notched end is lighter than the solid end.  Let’s add some yarn!


115_5648


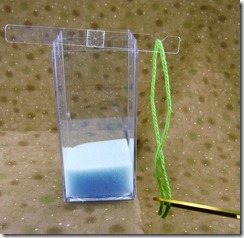
Cut off a 6-10" piece of the yarn you’re measuring.  The thinner/lighter the yarn, the longer the piece you’ll need (laceweight might need a much longer piece, or several pieces).  This piece is much heavier than the solid end of the arm.  You can see that the ends of the yarn are below the bottom of the balance- that’s why it’s a good idea to place the scale at the edge of a table, so that the yarn can hang freely.


115_5649 115_5650


Cut off a little bit of the yarn, then let the scale settle back.  Is it balanced (is the arm horizontal/not tilted)?  If not, trim off another little bit.  The key here is to trim off just a tiny bit each time.  You can always cut more off, but it’s not easy to fix if you overshoot!


115_5654


When the arm is horizontal, remove the piece of yarn and measure it with a ruler.  Don’t stretch it out so it’s taut, but you want it to be straight.  Let’s say this piece is 6” long.  Now for a little math:


Multiply the length of yarn by 100.  (6 inches x 100 = 600)


The resulting number is your “yards per pound” or ypp.  (600 ypp)


Chances are good that you don’t have a full pound of yarn, though!  Divide the number above by 16 (the number of ounces in a pound) to get the “yards per ounce” or ypo.  (600 ypp/16 oz = 37.5 ypo)


Now weigh your skein.  Multiply the weight of your skein by the ypo.  (2.3 oz x 37.5 ypo= 86.25 yards)


The final number is how many yards are in your skein.  (86.25 yards)


The instructions are the same for a metric version, but the math at the end is a little different.  I haven’t actually found the calculation online anywhere, but the balances come with the formula.


So, in the end, it turns out that I have about 400 yards of my handspun laceweight.  Not bad!
 

Turning a Batt into Rolags February 11, 2011

Filed under: spinning,Spinning Tutorial — Cailyn @ 2:25 pm
Tags: ,

115_5473


Rolags are a woolen spinning preparation.  Because of their structure, the fibers wrap and twist around each other and keep a core of air in the yarn.  This makes the yarn super warm.  It’s also very soft.  Rolags are usually made on hand cards, but if you don’t have hand cards you can tear up a batt into rolags.  You could roll up the batt into one huuuuuge rolag, actually.  A batt is what comes off of a drum carder, but it’s really just a big version of what comes off of a set of hand cards.  As far as I know, you can make rolags any size you want them.


115_5427


Unfold and unroll your batt onto a smooth surface, like a wood table.  You don’t want to do this on carpet!  The first time I did this, I was sitting on a hardwood floor.  The surface pictured is a laminate table from Ikea.


Notice how the batt has a “grain”?  The fibers aren’t perfectly aligned, but they are generally pointed left to right.  Turn the batt so that the “grain” is pointing towards you.  We’re going to strip the batt.


115_5428  115_5430


Decide how wide you want your strips.  The width of the strip will become the length of the finished rolag.  Last time, I used the width of my closed hand as a guideline (about 5”), but I found those rolags to be a little short especially when had to switch to my wheel instead of the spindle.  This time, I used the width of my spread hand (about 7”).  You can, of course, use an actual ruler or a book or anything for this step.  Once you’ve got a width decided on, gently strip the batt upwards along the “grain.”


115_5431


You should end up with a strip of fiber in your desired width.


115_5460  115_5436


Turn the strip so the grain is horizontal again.  Place your hand or a straight edge on the strip about a staple-length in.  Make sure that you’ve got all the fibers under your hand or straightedge (you may have to scrunch the strip a little) and press down firmly.


115_5438


Grasp the end of the strip in your other hand and pull gently.  If the pulling takes a lot of force, try moving your pressing hand forwards or backwards- likely your hand is not at the staple length.  Now, you don’t have to have the rolag be one staple length wide- you can put your hand two staple lengths in (just don’t pull from the end to tear the piece off), or just roll up the whole strip!


115_5461  115_5463  115_5464


You should end up with something like this.  The ends might be kind of raggity.  Unless it’s really ugly, don’t worry about it.  (I pulled that little bit of green fiber off the last piece there.)


115_5465  115_5466  115_5468


Start rolling the fibers up in the direction of the grain, from left to right.  This way, when you spin, the fibers will tangle around themselves- in a good way!  (If you roll from top to bottom, you get a semi-worsted preparation where the fibers are mostly aligned- I just learned that!)  Keep rolling until you get to the end of the piece, trying to keep the ends from flaring out too much.  Use a gentle touch.  I like to give my rolags a light roll against my pants when I’m done with them to smooth down any stray fibers.  Be gentle!!  You don’t want to squish out that core of air.


115_5469  115_5470

Sometimes it’s easier to roll the fiber around a knitting needle or dowel with slippery fibers.


115_5471


That’s it!  You can spin directly from these or attenuate/draft them into roving to spin.  I like to make the batt into rolags, then divide the resulting pile into the number of plies I want (in this case, two).  You could also split the batt ahead of time and keep the rolags separate. 


Rolag power!


Purl Cast On January 26, 2011

Filed under: knitting tutorials — Cailyn @ 12:38 pm
Tags: , , ,

It’s no secret that I love the long-tail cast on.  It’s a nice mix of firm and stretchy.  It doesn’t mutate into extra-long loops as you work the first row.  It’s pretty fast to do.


The long-tail cast on is essentially a cast on combined with a row of knitting, done at the same time.  That’s what gives it those wonderful properties.  That means that the long-tail should count as the first right side row of any work.  The long-tail cast on looks like a row of knit stitches, which is great if you’re working a piece of stockinette.  But what if you want your cast on to match the ribbing at the bottom of the sweater and are a relentless perfectionist?


If you can cast on and knit simultaneously, then you can cast on and purl simultaneously too.


Let’s review the knit long-tail a bit:


115_5404

Hold the working yarn (coming from the ball) over your thumb.  Hold the long tail over your index finger. (Or vice-versa.)  Let the loose ends drape down your palm and grasp them lightly in your other fingers.  This forms two loops, one over your thumb and one over your index finger.


115_5406  115_5407

The needle moves around and under the outer strand on the thumb and comes up in the middle of the loop.  Then the needle goes under the closest strand on the index finger, from outside moving inwards.  The strand is pulled through the loop and the resulting stitch is tightened up. 


115_5408  115_5409

The right side and wrong side of the cast on.


For the purl long-tail cast on, the set up is the same.  Hold the yarn as if to do a regular long-tail cast on.


115_5410  115_5413  115_5414

The needle moves around and under the outer strand on the index finger and comes up in the middle of the loop.  Then the needle goes under the closest strand on the thumb, from inside moving outwards.  The strand is pulled through the loop and the resulting purl stitch is tightened up. 


115_5415  115_5417

The right side and wrong side of the cast on.  See the purls?


115_5413  Snapshot 1 (1-25-2011 4-16 PM) (2)

Make sure that the needle goes under the strand from behind.  If the needle goes under from the front of the strand, the stitch will be twisted.


Look, a video!  There’s no sound, just real-time cast ons.  Exciting!


Chainmaille Pt 3 April 5, 2010

Filed under: Chainmaille Tutorials,Tutorials — Cailyn @ 2:14 pm
Tags: , ,

I don’t have anything interesting to say about knitting today.  So here’s a chainmaille tutorial!


100_1269    100_2579   100_1263


These balls are really fun to make.  They’re also impossible not to play with.  People simply cannot walk by without picking one up and fiddling with it.  When I sold jewelry at craft fairs, I always sold more of these balls than anything else.  When I realized that I should just be making balls and nothing else for the fairs, I decided to stop selling my chainmaille.  I just couldn’t churn out hundreds of these balls all the time- it wasn’t very creative, I wanted to make jewelry.  Luckily, this decision coincided with my starting to design knitting patterns, so it was okay.  You can see the sad remains of the ball-basket at the end of a fair day in this picture.


Booth Close Up  


The balls in the pictures are made from anodized aluminum, which I bought from the Ring Lord.  Made with thick gauge rings, they’re good for juggling, keychains, paperweights, and just plain old playthings.  My friend, Trina, makes some stunning pendants and earrings with these balls in precious metals and tiny rings.  She also makes lots of other stunningly beautiful pieces of jewelry!


100_1084   100_2321 (2)


From my previous posts on chainmaille:

To make chainmaille, you need two pairs of piers. Most chainmaillers use needle nose or chain nose, but I like to use a pair of bent nose pliers and a pair of flat nose pliers. Pliers without teeth are best if you’re going to be making silver or gold jewelry.  You’ll hold a pair of pliers in each hand, using them to open and close jump rings by twisting them towards and away from you. (Never pull jump rings from side to side! It’ll weaken the metal and mess up the shape of the ring.)

The jump rings can be made by hand by wrapping wire around a dowel to get a coil, then cutting the coil with snips or a jeweler’s saw to get individual rings. Or, my favorite method, save yourself the hassle and let a machine do all that coiling and cutting for you! Trust me, it takes forever to get enough rings for a large project like a necklace. Some of my favorite jump ring suppliers are the Ring Lord (great prices and variety, but terrible shipping time) and Spiderchain, a very talented chainmaille artist and of course, there are many suppliers on Etsy (including my destash!)

Chainmaille rings are “named” using the gauge of the wire used and the diameter of the dowel used to make the rings. For example, if I were to wrap a 20ga wire around a 1/8″ dowel rod, I would have a 20ga 1/8″ ring. Some ring sizes are better than others for certain weaves, like suggested needle sizes for knitting. You don’t want to knit fingering weight with size 7 needles (most of the time) and you don’t want to make a Byzantine weave with 18ga 1/8″ rings. Unlike knitting, though, where you can still knit with non-recommended needles, if you have a ring that is too small the weave will just not work. You just won’t be able to fit all the rings together. Most weaves have an “aspect ratio” that works best. The aspect ratio of a ring is the mm or inch measurement of the ring’s inner diameter (the space inside the ring) divided by the width of the wire (the mm or inch measurement, not the gauge). This is a great article about the effect of aspect ratio (or AR) on chainmaille: Aspect Ratio on Maille Artisans.


Download the tutorial here: Chainmaille Ball (PDF)

100_1265


Want more chainmaille?

Chainmaille Pt 1: Byzantine Weave

Chainmaille Pt 2: European 4-1 Weave


Twisted Stitches: Left vs Right January 19, 2010

Filed under: knitting tutorials,Tutorials — Cailyn @ 5:53 pm
Tags: , ,

I love knitting and especially designing twisted stitch socks.  Exhibit A: Danube, Salzburg, and Glass Slipper.  I’ve finally completed my collection of German stitch dictionaries (if you haven’t seen, they’ve reprinted all three Überlieferte Strickmuster into one volume over at Schoolhouse press).  Well, “completed” might be a bit strong- I’ve gotten enough that most traditional twisted cables are covered.  I’d consider myself a twisted stitch fanatic.  I know at least three ways to do the cable turns and I understand why twisted ribbing is stretchier than regular ribbing.


How is it, then, that I’ve missed learning about this fabulous information until now?


Something about these beautiful stitches has always bothered me.  You can see it on the accent cables on Salzburg.  One cable is very compressed and just looks likes close diagonal lines.  The other cable has some space between the diagonals, allowing you to see the way the cable swirls.  It happens with any of the twisted stitch cables.  The ones that travel to the right always seem squished, not as defined.  I’ve always wondered what caused that.  And, of course, what I could do to fix it.  (What can I say, I’m a huge perfectionist.)  I started to think that this phenomenon was just a fact of knitting, like the curl of stockinette or the inelasticity of stranded projects.


100_4188


I’m very glad that I always read “Ask a Knitter” in the Ravelry newsletter.  Usually I know the answers to most of the questions, but this time…!  This issue is written about just this problem.  Turns out that it’s the very twist of the stitch that causes this squishing, this lack of definition.


Knitting a stitch through the back loop causes the left side of the stitch to overlap the right.  This is a left-twisted stitch.  When a stitch like this travels to the left, it travels in the same direction as the twist.  The stitch stays flat, even, and well-defined.


102_4976


But when a left-twisted stitch travels to the right, it kind of rolls onto its side.  It’s traveling against the twist and the pull of the yarn makes the stitches appear narrow and squished.  Think about looking at a book cover versus looking at the spine.


If you’re a crazy perfectionist like me, you can twist the stitches so that the right side overlaps the left.  That way the twist of the stitch isn’t fighting the direction of travel.  To twist a stitch to the right, use the right needle to remount the stitch so that the right-leaning leg is in the back.  This is sometimes referred to as an “Eastern mounted stitch.”


102_4979


Then knit the stitch through the front leg, wrapping the yarn around the needle in the opposite direction of normal.  The opposite wrapping will make the new stitch have the same Eastern mount so that you don’t have to remount the stitch on the next row/round.  Ta da, a stitch with the right side overlapping the left!


102_4977


102_4977 2


You might notice some similarity in the above picture to this tutorial of lifted increases.  The principle is the same, creating directional stitches.  It’s also the same as M1L and M1R.


102_4981


See, no turning on their sides!  The stitches are flat and well defined.  Now, not everyone is as big a dork-perfectionist as I am, and not everyone is going to want to micromanage their twisted stitch projects so much as to change stitch mount for every right-traveling stitch.  But for those few of us who do, aren’t you glad to know about this?  Go check out the Ask a Knitter column in the #67 issue of This Week in Ravelry for more!