The Daily Skein

All the craft that’s fit to make.

Lunaria December 7, 2010

Filed under: patterns — Cailyn @ 10:23 pm
Tags: , , , , ,

I love designing, but sometimes I get stuck in an item rut.  You know, sock after sock pattern or just too many mittens in a row.  I love it when people give me ideas of items to design, especially if it’s a type of item that I’ve never made before, like leg warmers or a shawl.  Last Thanksgiving, my aunt was admiring my Snowflake Gloves and Wintergreen Gloves, which I had given to my sister.  My aunt said that she loved fingerless gloves for walking the dog but what she really needed was a hooded scarf, maybe with pockets to put the gloves in.  I jumped at the idea- a matching pair of fingerless gloves and a hooded scarf.


And it only took me one year to complete!


I finished the design for the gloves fairly quickly; per request, the colors were rich purples and cheery pinks.  The actual execution of the design took a lot longer.  Deadlines kept popping up and the gloves got pushed aside time and again.  I got one finished but then didn’t finish the second until two months later!  The scarf design went slower.  I wanted the same color work pattern from the gloves, but I detest knitting back and forth with two yarns.  I knew I’d never get it done if I did it that way.  On the other hand, I didn’t want to knit the entire scarf in fingering yarn in the round- that could take forever!  I eventually settled on working the color work in the round for the pockets and keeping the rest of the scarf in a solid color with a cushy stitch pattern.  What resulted is a hooded, pocketed scarf with no sewing or flat stranded knitting required.  So, exactly one year after I took on the glove and scarf project, I finished and presented them to my (very patient) aunt.  She loved them!


Lunaria is now up for sale at Knit Picks as a combined pattern set.  Both use seven colors of Palette yarn.  The scarf is worked with a double strand of yarn throughout, so it works up faster.


   113_5310  


The hooded scarf has two color work pockets and a dense slip stitch rib pattern for the main body. The slip stitch pattern is completely reversible, as are the pockets. The whole scarf, including the pockets, is worked with the yarn held doubled. The two halves of the scarf are made, then the hood is cast on between them and the whole hood is worked together with the scarf halves to the end. A three-needle bind off neatly avoids having to sew the hood together.


 113_5305  


The gloves are worked with a single strand.  They feature a long ribbed cuff, accented with a few stripes, and a traditional side thumb gusset, increased every third row.


110_5279   000_0098


The pair of projects is named after the flower the Annual Honesty , or Lunaria annua, which has four petals ranging from white to deep purple when in bloom. The seeds are papery, translucent sliver discs in the winter, giving it its other common name in America, “Silver Dollars.”


image


Crystalline Socks January 5, 2009

Filed under: Knitting Projects,patterns — Cailyn @ 11:13 am
Tags: , , , ,

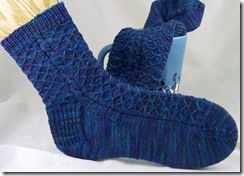
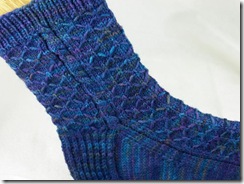
I designed and knit these socks as a gift for my mother-in-law for Christmas.  Believe it or not, these socks are the first socks I’ve ever knit for someone else!  Not many people are clamoring for hand-knit socks these days, which I think is a shame, but it does mean that I have more for myself.  I know that the stitch pattern I used is named “quilted stockinette,” but the pattern really reminds me of a crystal structure instead.

 100_4124

These socks are great for hand-painted yarns.  The quilted/crystal pattern breaks up the pooling that hand-painted yarns have a tendency to do.  The quilted pattern is also simple to work and easy to memorize, with every other row being plain knitting.  The pattern is created by slipping stitches with the yarn held in front, in order to create a loose strand across the front of the work which is then lifted up by knitting it together with a stitch in a later row.  The cables add some visual interest along the leg, but really they’re just there because I love cables.


The quilted stockinette sections and cables are worked at the same time, but the number of rows in each are not the same.  This means that the quilted pattern starts over before the cable does.  Work the first round of each element, then the next round of each, and so on, so that you might be working Round 3 of the quilted stockinette but Round 5 of the cable at the same time.  Keep an even (maybe slightly loose) tension with the yarn across the slipped stitches; pulling them too tight will cause the fabric to pucker.  Because slipped stitches are shorter than knit stitches, the instep of the sock will be shorter than the sole.  This is corrected somewhat by adding an extra row at the toe to the instep, but will mostly be unnoticeable when the sock is worn.


These socks were knit with two circular needles, but the pattern is written to be non-needle-specific.  The pattern does not tell you how many stitches to put on each needle or have instructions such as “work to the end of Needle 1.”


Edit 1/14/08: Edited the cable instructions to make them easier (I hope) to follow.  Instead of being part of the written instructions, the purl stitches are part of the cable charts.  Also corrected the first round after the ribbing.


 100_4114    100_4118


Crystalline Socks

Download the PDF: Crystalline Socks

  • Finished Size: Foot length 9″, circumference 8.5″
  • Needles: Size 1 (2.25mm) DPNS or circular(s)
  • Yarn: Dream in Color Smooshy, Deep Sea Flower
  • Yardage: 280-300 yards
  • Gauge: 34 sts x 52 rows = 4″ in Quilted Stockinette
  • Extras: Cable needle, stitch markers, stitch holder, tapestry needle


Special Stitches

Sl wyif: Slip stitch purlwise with yarn held in front of work, leaving a strand across the front.

Q1: Quilt 1; insert right needle into loose strand two rows below and knit together with next stitch

Quilted Stockinette:

Round 1: K2, *sl5 wyif, k1,* end k1.crystalline

Rounds 2, 4, 6, 8: Knit.

Round 3: K4, *Q1, k5,* to last 5 sts, Q1, k4.

Round 5: K1, sl 3 wyif, *k1, sl 5 wyif,* to last 5 sts, k1, sl 3 wyif, k1.

Round 7: K1, *Q1, k5,* to last 2 sts, Q1, k1.

Cable (click thumbnail to enlarge chart)

C4F: Slip next two stitches onto the cable needle and hold to the front of the work.  Knit the next two stitches, then the stitches from the cable needle. 

C4B: Slip next two stitches onto the cable needle and hold to the back of the work.  Knit the next two stitches, then the stitches from the cable needle.


Cuff

CO 66 stitches and join to begin working in the round, being careful not to twist.  Place a marker for the beginning of the round.

Ribbing: *K1, p1* to the end of the round.  Work for  Ribbing for 1″.


Leg

Set up round: K27, p1, k4, p1, k27, p1, k4, p1.

Starting on Round 1 of both the Quilted Stockinette and Cables A and B, work 27 sts in Quilted Stockinette, p1, Cable A, 27 sts in Quilted Stockinette, Cable B.

Continue working the Quilted Stockinette and the two cables at the same time until the leg is the desired length.


Heel Flap

Set up: Work next round as normal, stopping 3 sts before the end of the round, turn.

Row 1: Sl 1, p2tog, p30, turn.  32 sts on heel flap.

Heel flap will be worked back and forth on these 32 heel stitches.  Put other 33 stitches on a stitch holder, spare needle, or scrap yarn. 

Row 2: *Sl 1, k1* to the end of the row, turn.

Row 3: Sl 1, purl to the end of the row, turn.

Repeat Rows 2 and 3 30 more times, for a total of 34 rows (17 slipped stitches on each side) ending after row 3.


Heel Turn

Row 1: Sl 1, k17, ssk, k1, turn.

Row 2: Sl 1, p5, p2tog, p1, turn.

Row 3: Sl 1, k6, ssk, k1, turn.

Row 4: Sl 1, p7, p2tog, p1, turn.

Continue working 1 more stitch per row, until all stitches have been worked, ending after a WS row.  19 sts remain.

Sl 1 and knit across the heel.  Return other 33 stitches, which form the instep, to the needle(s).


Gusset

Pick up and knit 17 stitches along the heel flap, 1 in each slipped stitch. Instep: k2, p1, work 27 sts in Quilted Stockinette, p1, k2.  Pick up and knit 17 sts along in the heel flap, k9.  Place marker to mark the beginning of the round.  34 sts increased, 86 sts.

Round 1: Knit to the last 3 sts before the instep, k2tog, k1, work across instep (k2, p1, work 27 sts in Quilted Stockinette, p1, k2), k1, ssk, work to the end of the round.  2 sts decreased.

Round 2: Work even, working instep pattern as established.

Repeat Rounds 1 and 2 until there are 66 sts remaining.


Foot

Continue working instep as established and work sole in stockinette stitch until foot is about 1.5 inches shorter than desired length.


Toe

Set up: Work to instep, knit across instep, place marker for the new beginning of the round.

Round 1: K1, ssk, k to 3 sts before the end of the sole, k2tog, k2, ssk, k to 3 sts before the end of the instep, k2tog, k1. 4 sts decreased.

Round 2: Knit.

Repeat Rounds 1 and 2 until there are 22 sts remaining.

Graft the remaining sts together using Kitchener stitch.

Weave in all ends and block if desired.


Please Note: I post my patterns as soon as I’ve completed them because I’m excited to share them with you. They have not been fully tested. But they are free. I’ve made every effort to make sure that the instructions are clear and error-free. There may be typos or pattern mistakes and if you find them or have any questions, please let me know by posting a comment or emailing me, dailyskein at gmail.com.


Creative Commons License
This work by Cailyn Meyer is licensed under a Creative Commons Attribution-Noncommercial-Share Alike 3.0 United States License.


Emily’s Scarf November 7, 2008

Filed under: Knitting Projects,patterns — Cailyn @ 4:24 pm
Tags: , , , , ,

 100_3947 So, the scarf is finally finished.  Completely and totally done.  And the final verdict is… undecided.  I honestly can’t figure out if I like this scarf or not.  I like a lot, if it were for me, but I’m not sure if it’s the right scarf to give as a present.  Is it too plain?  Should I have gone with something lacier?  Something cabled?  Does this scarf look like something you could pick up at Target, I wonder?  I wanted to use luxury fibers at first, but had trouble finding the right colors.  Cascade 220 is a great yarn and it feels just fine against the face as a scarf.  But maybe I should have gone with the alpaca?…


Argh.  That’s just a small insight into my mind for the last few weeks.  Every stitch has been second-guessed and questioned and analyzed.  I guess I’ll know the answer when I give my sister the scarf at the end of the month.  If I get that face- you know the one, the “oh, it’s… knitted” face- then maybe next time I’ll, well, I don’t know what I’ll do. Of course, there’s always the chance that she’ll love it.  My sister is an artist, so she really appreciates handmade items.  But appreciating a handmade item and really liking the pattern I created are different things, eh?  Lowell thinks it’s a cool scarf, but then he’s neither a knitter nor a teenage girl (thank goodness!)  What do you guys think about the scarf?  Yea or nay?


On a more technical note, the scarf is pretty easy to make.  The Herringbone Stitch that’s used for the majority of the scarf is very easy to memorize and pretty fun to do.  The scarf doesn’t curl and the wrong side doesn’t look half bad either!  The beginning and ending have a slight chevron edge as well as a pretty snowflake lace pattern.  The lace pattern may seem daunting in the written instructions, but it’s really not that bad.  By the end of the lace section, you’ll probably have the pattern memorized, then completely forget it by the time you get to the ending section.  The stripes, of course, can be made any length you want if you’d like a longer or shorter scarf.  If you make the scarf about 6″ shorter or make the blue stripes or lace sections longer, you can make this scarf with only 1 skein of brown instead of 2.


100_3932      100_3922

Emily’s Scarf

Download the PDF: Emily’s Scarf


  • Finished Size: 62”x 5”
  • Needles: Size 9 (5.50mm) straights or circular, Size 10 1/2 (6.50mm) straights or circular
  • Yarn: Cascade 220, Brown (8686) 2 skeins/280 yds; Natural (8010) 1 skein/ 100 yds; Summer Sky Blue (7815) 1 skein/100 yds
  • Gauge:  19 sts x 17.5 rows = 4 inches in Herringbone Stitch
  • Extras: Tapestry needle


Special Stitches

Herringbone Stitch

Row 1 (RS): Sl 1, *YO, sl 1, k2, psso* to the end.

Row 2 (WS): Sl 1, *YO, sl1, p2, psso* to the end.

Optional: slip the first stitch of every row (counts as the first stitch) for a neater edge.


With smaller needles, CO 31 sts in Natural.

Knit 1 row (WS).

Chevron Row 1: Sl 1, YO, k3, sl 1, k2tog, psso, *k3, YO, k1, YO, k3, sl 1, k2tog, psso,* to the last 4 sts, k3, YO, k1.

Chevron Row 2: Purl.

Repeat the last two rows once more.

Snowflake Lace

Row 1 (RS): K5, ssk, YO, k1, YO, k2tog, *k3, ssk, YO, k1, YO, k2tog,* to the last 5 sts, k5.

Row 2 and all even rows: Purl.

Row 3: K6, YO, sl 1, k2tog, psso, YO, *k5, YO, sl 1, k2tog, psso, YO,* to the last 6 sts, k6.

Row 5: Repeat Row 1.

Row 7: K1, ssk, YO, k1, YO, k2tog, *k3, ssk, YO, k1, YO, k2tog,* to the last st, k1.

Row 9: K2, YO, sl 1, k2tog, psso, YO, *k5, YO, sl 1, k2tog, psso, YO,* to the last 2 sts, k2.

Row 11: Repeat Row 7.

Row 12: Purl.

Repeat Rows 1-12 2 more times, for a total of 6 rows of snowflakes.

Knit 1 row and then switch to Brown. Purl 1 row. Switch to larger needles.

Work Herringbone Stitch in Brown for 14 inches, ending with a WS row.

Switch to Blue. Work Herringbone Stitch for 2 inches, ending with a WS row.

Switch to Brown. Work Herringbone Stitch for 9 inches, ending with a WS row.

Switch to Blue. Work Herringbone Stitch for 1 inch, ending with a WS row.

Switch to Brown. Work Herringbone Stitch for 4 1/4 inches, ending with a WS row.

Switch to Blue. Work Herringbone Stitch for 1 1/4 inches, ending with a WS row.

Switch to Brown. Work Herringbone Stitch for 4 1/4 inches, ending with a WS row.

Switch to Blue. Work Herringbone Stitch for 1 inch, ending with a WS row.

Switch to Brown. Work Herringbone Stitch for 9 inches, ending with a WS row.

Switch to Blue. Work Herringbone Stitch for 2 inches, ending with a WS row.

Switch to Brown. Work Herringbone Stitch in Brown for 14 inches, ending with a WS row.

Switch to smaller needles. Knit 1 row, knitting each YO through the back loop. Join Natural and purl 1 row.

Beginning on Row 7, work Snowflake Lace three times through (total of 6 rows of snowflakes).

Ripple Row 1: Sl 1, YO, k3, sl 1, k2tog, psso, *k3, YO, k1, YO, k3, sl 1, k2tog, psso,* to the last 4 sts, k3, YO, k1.

Ripple Row 2: Purl.

Repeat the Ripple Row 1 once more.

Knit 2 rows.

BO all stitches.

Weave in ends.  Block lace sections, pinning the peaks at the beginning and end to keep them pointy.

100_3929   100_3941


Please Note: I post my patterns as soon as I’ve completed them because I’m excited to share them with you. They have not been fully tested, but they are free. I’ve made every effort to make sure that the instructions are clear and error-free. There may be typos or pattern mistakes and if you find them or have any questions, please let me know by posting a comment or emailing me, dailyskein at gmail.com.


Creative Commons License
This work by Cailyn Meyer is licensed under a Creative Commons Attribution-Noncommercial-Share Alike 3.0 United States License.


Shenandoah Socks May 6, 2008

I bought some KnitPicks Essential in the Tuscany colorway a little while ago. Well, 10 months ago, actually. Anyway. I fought with myself, who wanted to buy something in blue or purple, and my other self who said I should expand my palette and get something in red, which I hardly ever do. I’ve had this conversation with myself before. And I imagine you have too. It almost always ends up with something red, orange, olive, etc in my closet or stash that I never wear or use. I like those colors, I do, they just don’t call to me like blue, purple, and green. So, I bought Tuscany instead of Blue Violet and it’s been sitting in my stash ever since. Later, I bought some Black, thinking I would use it in a project for DH, but that never happened. Recently, I had to clean up my stash room- I mean our guest room- and saw those two balls sitting next to each other. Beautiful!

I was flipping through Favorite Socks, as I often am, and I was in love with the look of the Hidden Passion Socks. The stripes, the solid color sole, the band around the ankle… But I’m not that fond of illusion knitting- wait! Inspiration!

After quickly glancing over the instructions for the Hidden Passion Socks, I decided that they were too complicated and that I could obviously make the same thing simpler. (Ever said that to yourself?) Well, I knit up the first sock with surprisingly few hiccups, using the aforementioned Tuscany and Black. Very pleased with myself, I looked back at the Hidden Passion Socks instructions. They were almost identical to my "simpler" instructions! So much for that.

The Tuscany colorway reminds me of the leaves in autumn in my native Virginia. I really miss those beautiful colors here in Seattle. Hence, naming these socks Shenandoah, despite the difficult spelling, lol. I love the construction of these socks, so unusual and interesting. I’m planning on knitting up a few other designs based on the same principles, so I think these socks are going to be the first in a series.

Shenandoah uses a slip stitch pattern on the foot and leg. Slip stitch is an easy colorwork technique, because you’re only using one color per row. Shenandoah is essentially a toe up sock, but isn’t knit in the round between the toe and heel. After completing the increases for the toe normally, the instep stitches are worked separately. Then the sole is knit while joining it to the instep. A "heel flap" is knit, turned, and stitches are picked up along the flap, just like a top-down sock. The gusset is decreased, then the stitch pattern resumes for the leg. I swear I wrote down every detail while I was knitting these… but when I went to type it up, some of those details weren’t there. I’ve tried to be as accurate as I can, but if you find any mistakes or are confused by anything, please let me know!

Shenandoah Socks

Download the PDF: Shenandoah Socks

  • Finished Size: Women’s 9 (foot length 9.5")
  • Needles: 2 Size 1 (2.25) circular needles; 2 Size 0 circular needles-optional
  • Yarn: KnitPicks Essential: MC – Black (2 balls), CC – Tuscany (1 ball)
  • Yardage: Black, 340 yards; Tuscany, 120 yards
  • Extras: Stitch markers, stitch holder or scrap yarn, tapestry needle
  • Gauge: 8 sts x 11 rows= 1" in stockinette

Special Stitches

wyif: with yarn held in front, as in "slip 1 st with yarn held in front"

wyib: with yarn held in front, as in "slip 1 st with yarn held in front"

SSLK: Slip the last stitch knitwise, pick up the two loops of the next slipped stitch on the instep, slip the two loops purlwise, insert right needle into the front loops of the two loops and the slipped stitch and knit all 3 together. (A modified Slip, Slip, Knit.)

SSLP: Slip the last stitch knitwise, pick up the two loops of the next slipped stitch on the instep, slip the two loops knitwise, return the two loops and the slipped stitch to left needle, and purl all 3 together. (A modified Slip, Slip, Purl.)

Toe

Using Judy’s Magic Cast On, CO 12 sts to each needle in MC. 24 sts

The starting needle (Needle 1) is the top/instep. The second needle (Needle 2) is the bottom/sole.

Round 1: Knit.

Round 2: K1, M1, knit to last st on Needle 1, m1, k2, m1, knit to last st on Needle 2, m1, k1. 4 sts increased.

Repeat Round 1 and 2 until there are 64 sts total, 32 sts on each needle.

Instep

Place the sole sts (Needle 2) on a stitch holder or scrap yarn. You can also pull the sts to the cable section of your circular needle, but I find that the dangling needle ends get in the way. You will now be working back and forth on Needle 1.

Tip: Pull slipped stitches tight on the needle to reduce holes.

Row 1: Sl 1 wyib, k15, m1, k16. 1 st increased. 33 sts

Row 2: Sl 1 wyif, purl all sts.

Row 1 and 2 count as the first 2 rows of the slip stitch pattern for the first repeat.

Join CC. Don’t cut MC, just twist the two yarns together on the WS before each knit row to carry the MC yarn upwards. To twist the yarns, place the carried yarn over or under the working yarn and knit first stitch as normal. The MC yarn should be caught between the CC yarn and the work. When you’re done, you get a nice dotted line of MC yarn up the right-hand side of the work. Make sure that the last MC and CC slipped sts are snug; they can become loose waiting until the next MC or CC row, but don’t pull them too tight.

Start Slip Stitch Pattern (Foot) on Row 3Odd rows are RS, even rows are WS.

Slip Stitch Pattern (Foot):

Row 1 (MC): Sl 1 wyib, k1, *sl 1 wyif, k1* until 3 sts before the end, sl 1 wyif, k2.

Row 2 (MC): Sl 1 wyif, purl all sts.

Row 3 (CC): Sl 1, k1, *k1, sl1 wyif* until 3 sts before the end, k3.

Row 4 (CC): Sl 1 wyif, purl all sts.

Row 5 (CC): Sl 1 wyib, knit all sts.

Row 6 (CC): Sl 1 wyif, purl all sts.

Repeat these 6 rows until instep measures 7.25”, or 2.25” shorter than desired foot length, from the tip of the toe, ending after a WS row. Cut MC and CC yarns.

Place instep sts on a stitch holder or scrap yarn. Return sole sts to a needle. You’ll now be working back and forth on the new needle. Join MC yarn with the RS of the sole facing you. (Ignore the markers in the following picture.)

Sole/"Heel Flap"

Row 1 (RS): With the left needle, pick up the two loops of the first slipped stitch on the instep and move them (correctly mounted) to the right hand needle. Knit the two picked up loops together with the first stitch on the needle. Knit to 1 st before the end of the needle, SSLK.

Row 2 (WS): Sl 1, purl to last st, SSLP.

Row 3: Sl 1, knit to last st, SSLK.

Repeat Rows 2 and 3 until all slipped sts have been used, ending after a RS row (do not use sts on the stitch holder or scrap yarn.) (Ignore the markers in the following picture.)


Row 4 (WS): Sl 1, p27. Place last 4 sts onto the stitch holder or scrap yarn. 1 st decreased. 28 sts on needle.

Row 5 (RS): Sl 1, k23. Place last 4 sts onto the stitch holder or scrap yarn. 24 sts on needle.

These 24 stitches will be the bottom of the heel; this would be the heel flap if we were making a top-down sock.

Row 6 (WS): Sl 1, purl all sts.

Row 7 (RS): Sl 1, knit all sts.

Repeat Rows 6 and 7 until the sole measures 9”, or .5” shorter than desired foot length, from the toe of the sock, ending after Row 6.

Heel Turn:

Row 1: Sl 1, k16, ssk, turn.

Row 2: Sl 1, p8, p2tog, turn.

Row 3: Sl 1, k8, ssk, turn.

Repeat Rows 2 and 3 until all sts have been worked, ending after Row 2. 10 sts remain.

Knit across all sts on needle. Pick up and knit 1 st in each slipped stitch along the “heel flap.” Return all held sts to needles. Place a marker between the last picked up stitch and the first held stitch. Knit across 4 held sole sts, all instep sts, and the other 4 held sole sts. Place a marker between the last held stitch and the first picked up stitch. Pick up and knit 1 st in each slipped stitch along the “heel flap.” Knit 5 stitches from the heel and mark as the beginning of the round.

Gusset Decreases:

Row 1: Knit to 3 stitches before the first marker, k2tog, k1. Knit to the second marker, k1, ssk, knit to the end of the round. 2 sts deceased.

Row 2: Knit.

Repeat Rows 1 and 2 until 64 sts remain.

Join CC. Row 1 and 2 count as the first 2 rows of the slip stitch pattern for the first repeat. Start Slip Stitch Pattern (Leg) on Row 3.

Slip Stitch Pattern (Leg):

Row 1(MC): *sl 1 wyif, k1*

Row 2(MC): Knit

Row 3(CC): *k1, sl1 wyif*

Row 4, 5, 6(CC): Knit

Repeat Rows 1-6 until leg is desired length (7 repeats shown in photos.)

Switch to smaller needles if desired.

Work 15 rounds k1 p1.

BO very loosely.


Please Note: I post my patterns as soon as I’ve completed them because I’m excited to share them with you. They have not been fully tested. But they are free. I’ve made every effort to make sure that the instructions are clear and error-free. There may be typos or pattern mistakes and if you find them or have any questions, please let me know by posting a comment or emailing me, dailyskein at gmail.com.


Creative Commons License
This work by Cailyn Meyer is licensed under a Creative Commons Attribution-Noncommercial-Share Alike 3.0 United States License.