The Daily Skein

All the craft that’s fit to make.

Chapter 3: In Which… July 31, 2008

Filed under: Musings — Cailyn @ 4:43 pm
Tags:

…We Learn the Inner Workings of Our Author’s Mind

No, I didn’t just post a rocking sock pattern and then take off for Mexico with my imaginary ill-gotten gains.  It’s been very stressful here, which I’ll enumerate shortly.  I want to take a minute to say thanks to everyone who’s commented on the Danube Socks! I’m really glad they’re a hit and I really enjoyed knitting them.  I’m already planning another twisted stitch design… I think I’m hooked!

Why has it been so stressful here, you ask?  Well, I’m ashamed to admit it, but I’ll come confess.  I’m getting my wisdom teeth (all of them!) out next Monday.  And I’m scared to death about it.  Everyone says it’s no big deal.  Doctor says I’ll be so drugged up that I won’t even remember pre-op when I wake up.  Hubby says everything will be fine.  But I can’t stop thinking about it.  I’m having trouble sleeping and I’ve been nauseous all week.  Not fun.  Every time I think about it I want to smash something in pent up frustration-fear or want to cry (usually solved by a nice peaceful stash dive).  I’ve never had any kind of surgery before.  I like to think of myself as a fairly no-nonsense person, someone who does what needs doing, a cool head in a crisis.  But this has knocked me for one hell of a loop.

Anyway, long story short, I haven’t felt much like writing lately.  On the plus side, I get a drug named “Vicoprofen” for afterwards (can you guess what that drug is made of?) For some reason, that name really cracks me up.

As I mentioned in an earlier post, I was scheduled to teach some Girl Scouts this week.  I taught 6 classes in 3 days at a Girl Scout camp for girls 5th-11th grade.  It was pretty fun.  We made all kinds of chainmaille, tutorials for which will probably be up on the blog soon.  I also got to hook up with a good friend who I haven’t seen in a while who was also teaching there.  She took some of my adult classes on chainmaille and she’s done fabulous things with it!  Check out her Etsy shop and website.  (Just because I can’t make chainmaille anymore doesn’t mean that I can’t spread the word about it!)

So that took up a lot of time, time that I could have been knitting!  I’m trying to design a sock to submit to Knitty, which isn’t going as smoothly as I had hoped.  I’m using a great colorway (sorry, it’s a surprise!) from Blue Moon Fibers.  I also ordered a little something else… all I can say is that the yarn looks stunning in person!  I also snagged a copy of two of the old Harmony Guides, which I actually like a little better than the new ones.  So many pretty stitch patterns, just waiting to be knit into socks and mittens and gloves and hats…

Erm, excuse me.  I have to go knit.


Twist and Shout July 24, 2008

Filed under: knitting tutorials,Tutorials — Cailyn @ 11:54 am
Tags: ,

As promised, a tutorial on twisting stitches without a cable needle. This is my favorite way to do twisted stitches, but there are others. The other method that I’m familiar with is to use a combo of k2tog and then knitting into one of the stitches again. That just seemed too… let’s say “annoying” when there were going to be a lot of purl stitches to deal with. The following method is used by Nancy Bush in Folk Socks for her Chalet Socks and by Eunny Jang for her Bayerische Socks (both of which were inspiration for the Danubes.) I do my twists so that the loose stitch is always at the front of the work (I think it’s easier to pick them back up) but Eunny does her left twists slightly differently.

Like I said before, twisting stitches is very similar to cabling without a cable needle, so if you’ve done that before, this will be a piece of cake. (Here’s a different tutorial from Wendy.) If not, I suggest getting some chocolate and maybe some relaxing music- the first few times you do this it can be a mite stressful. 😉 I used some kitchen cotton in the pictures- don’t use that to practice! Use a nice wool, something that sticks to itself pretty well and doesn’t split a lot. (In other words, acrylic is not recommended.)

Twisting Stitches for Austrian/Bavarian Patterns

Left Twist

From the back of the work, insert the right needle into the back of the second stitch on the left needle.

Take a deep breath and pull the left needle out of the two stitches. The first stitch will be hanging free. Don’t worry, it’s not going anywhere.

Reinsert the left needle into the loose stitch. (Ah, safe again!) Slip the stitch on the right needle back to the left needle. Now you can knit both stitches tbl or purl 1, knit 1 tbl as the pattern demands. (Here’s a tip for the Left Purl Twists, because the stitches can get tight: Before twisting the stitches, bring the yarn to the front; when you slip the right stitch back to the left needle, don’t pull the right needle out, just purl from there. No pictures of that right now, sorry.)

Right Twist

Slip the next two stitches purlwise to the right needle.

From the back, insert the left needle into the back of the first slipped stitch.

Another deep breath and… Pull the right needle out of both stitches. The second stitch is waving in the breeze. Reinsert the right needle into the loose stitch (you can breathe again now)

… and slip the stitch back to the left needle. Now, knit two tbl or knit 1tbl, purl 1 as the pattern dictates.

(Another tip, which works for both right and left twists: If the first stitch is a knit, don’t pull the right needle out after slipping the stitch back to the left; rotate the needle to the back of the stitch and knit it tbl like normal.)


Danube Socks July 23, 2008

Filed under: patterns — Cailyn @ 2:44 pm
Tags: , , , , , ,

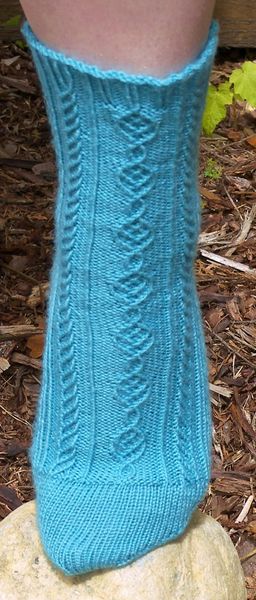
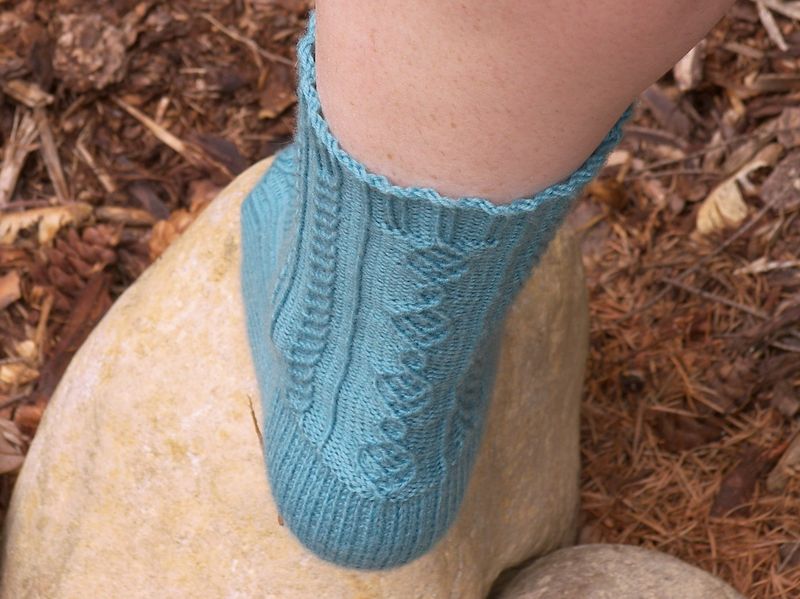
Here they are, the Danube socks! (Finally!)

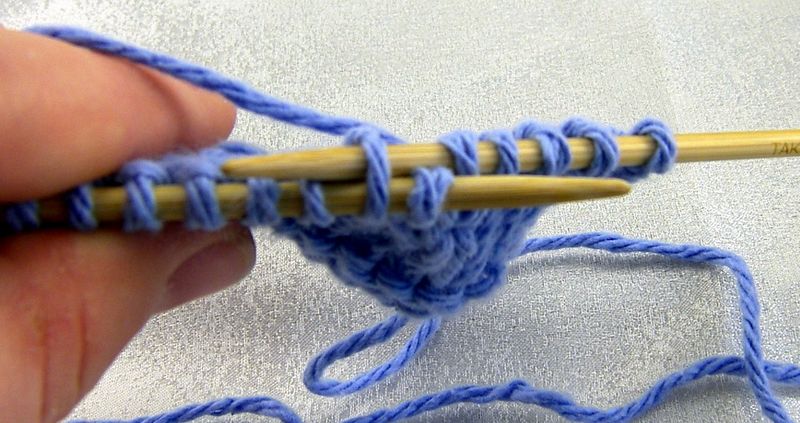
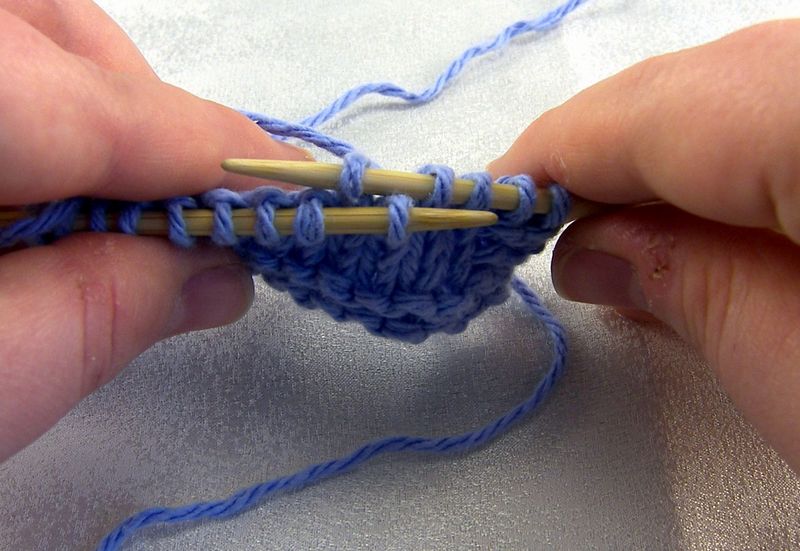
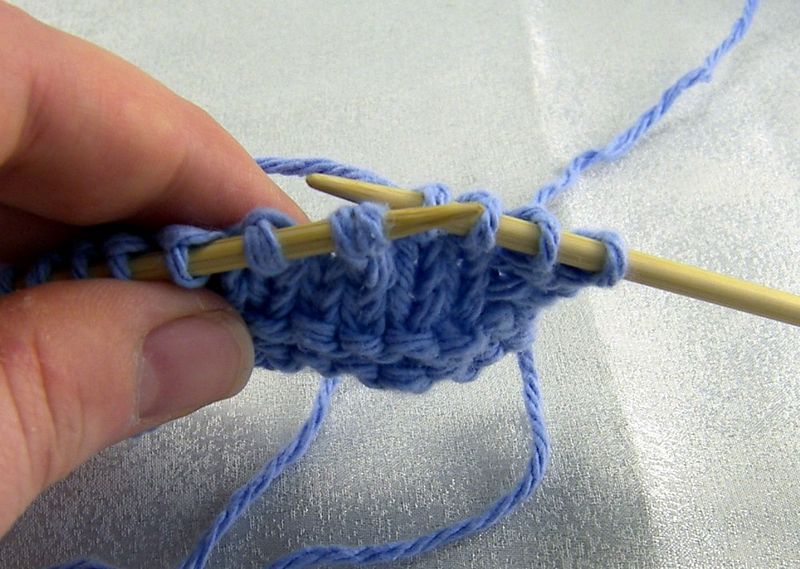
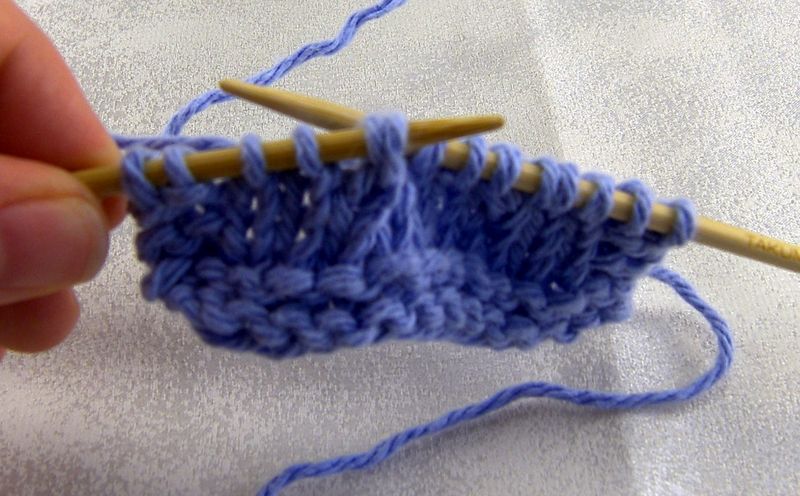
I’m not going to say that these socks are easy. But they were a lot easier than I expected. If you’ve done cables and you’ve made a sock before, you can do these socks! The center cable is complex, but the side cables pretty much take care of themselves. Some of the cables take a knit stitch and turn it into a purl or vise versa, so trust in the chart! (I forgot my own advice sometimes.) Also, unlike larger cables, there are cable twists every row. I’m going to post some pictures of how to do a twisted stitch tomorrow, in case the written description is confusing. It’s similar to cabling without a cable needle, just with fewer stitches.

One other word of advice- the ribbing at the top is pretty, but not very functional. I’ve broken it into sections for the written instructions, separated by semi-colons. The ribbing seems random, but there’s a pattern, I promise. And it’s really only the first row that you have to really pay attention to. After that it’s just working the stitches as they’re presented. Feel free to substitute your own favorite ribbing pattern instead, though. Oh, and do yourself a favor and gauge in the round- twisting stitches on the WS is not fun.

I made these socks on 2 circs- I particularly love the two circ method for cables, because I don’t have to worry about a cable traveling over a needle join. I also love the magic of working with DPNs, though, so I’ve tried to write the pattern as non-needle specific as possible. There are no guidelines as to how to arrange the stitches, except for the heel, so I hope the instructions are clear. I like to use stitch markers to mark the beginning of the round and the start and end of the instep sts.

Danube Socks

Download the PDF: Danube Socks

  • Finished Size: Women’s 9 (9.5″ foot length)
  • Needles: Size 1 (2.25mm) DPNs or 2 circulars
  • Yarn: Knit Picks Essential, Mermaid (2 skeins)
  • Yardage: 400 yards
  • Extras: Stitch markers, stitch holder or scrap yarn, tapestry needle
  • Gauge: 9 sts x 12 rows= 1″ in stockinette; first 29 sts x 18 rows of Chart A= 2.5″ x1.5″

Special Stitches

PYI Ribbing (Pretty But Ineffectual Ribbing): *P2, k2, p2, k1; p2, (k1, p1,) twice, k1; p2, k1, p1, (k2, p2) twice, k2, p1, k1; p2, (k1, p1) twice, k1; p2, k1* twice

1×1 Twisted Ribbing: *k1 tbl, p1* repeat to the end of the round.

Right Twist: Slip next two stitches purlwise. From the back, insert the left needle into the back of the first slipped stitch. Pull the right needle from both stitches and reinsert right needle into the loose stitch from the front. Slip this stitch back to the left needle, then k2 tbl.

Stitch Key

Cable Key

Left Twist: Insert the right needle into the back of the second stitch on the left needle. Pull left needle out of the first two stitches and reinsert the left needle into the loose stitch from the front. Replace stitch on right needle to left needle, then k2tbl.

Right Purl Twist: Perform a Right Twist, but at the end, k1tbl, p1.

Left Purl Twist: Perform a Left Twist, but at the end, p1, k1tbl.

(See tutorial here.)

All knit stitches on Chart A and B are knit through the back loop (tbl). Gray stitches on the chart are purled.

Leg

CO 80 sts using the Long Tail Cast On.

Work PYI Ribbing OR 1×1 Twisted Ribbing for about 1”.

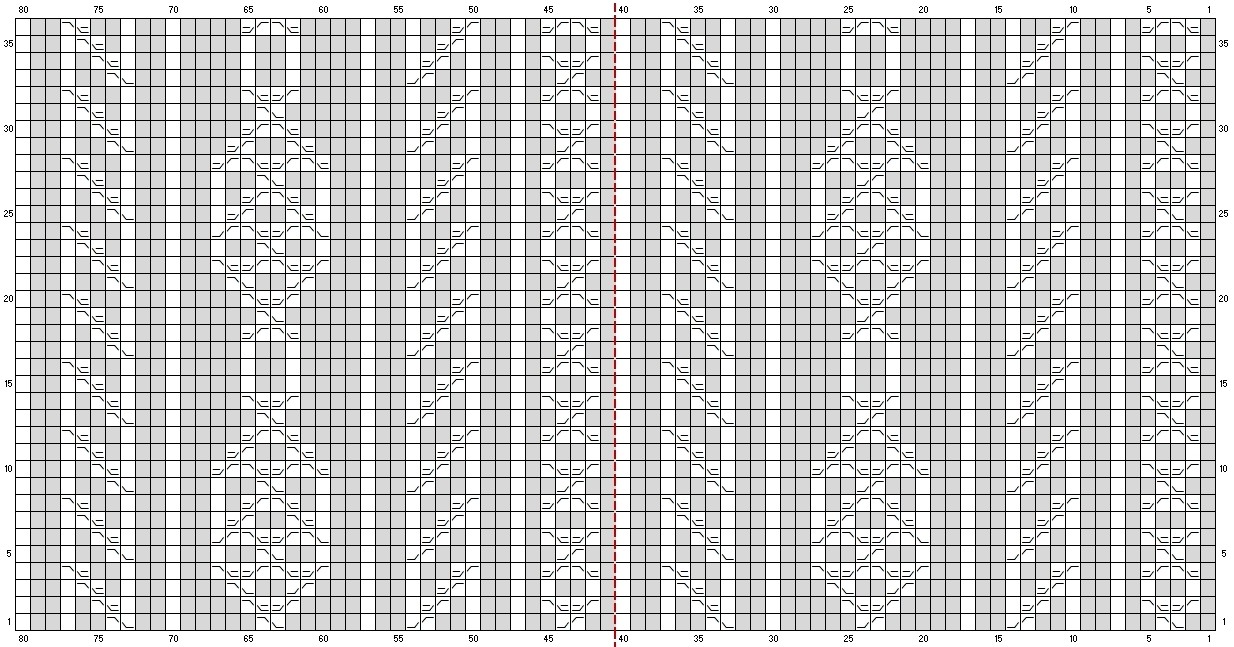
Work Chart A completely once, then work Rounds 1 to 30 of Chart A again. (The red line just shows the halfway mark on the chart.)

Chart A - Leg

Divide for heel: Work Round 31 of Chart A. At the end of the round, work the first 3 stitches as presented from the beginning of the round, turn.

Heel

Row 1 (WS): Sl 1, p39, turn.

Row 2 (RS): *Sl 1, k1* repeat until the end of the row, turn.

(After the first few rows, you may want to put the other 40 sts on a holder or scrap yarn.)

Repeat these two rows 28 more times for a total of 30 rows, then work Row 1 again. RS will be facing.

Heel Turn

Row 1 (RS): Sl 1, k22, ssk, k1, turn.

Row 2 (WS): Sl 1, p7, p2tog, p1, turn.

Row 3 (RS): Sl 1, k8, ssk, k1, turn.

Repeat Row 2 and 3, working 1 more stitch every row, until all stitches have been worked, ending after a WS row. 24 stitches remain.

Turn and knit across all heel stitches.

Gusset

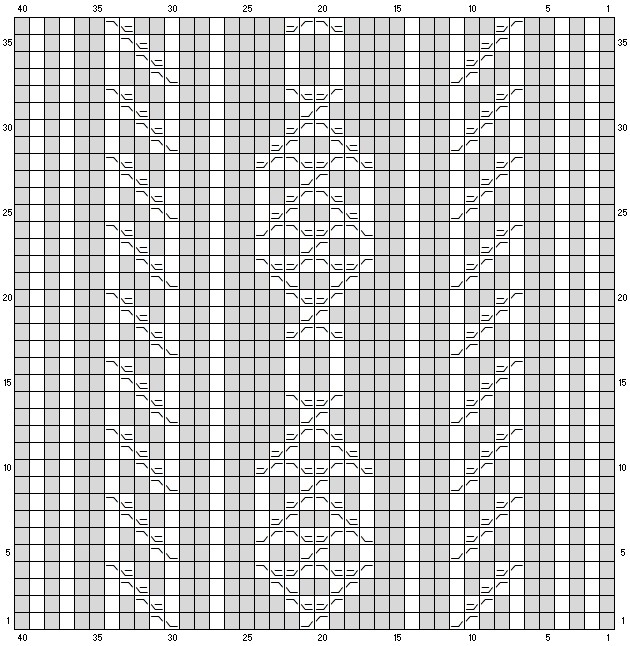
Pick up and knit through the back loop 16 stitches along the heel flap and 1 st in the gap between the flap and the instep. (17 sts increased). Work Row 1 of Chart B across the held instep stitches. Pick up and knit through the back loop 1 st in the gap and 16 stitches along the heel flap (17 sts increased), k12 heel stitches to move the beginning of the round. Beginning of the round is now in the center of the heel. 98 sts.

Chart B - Instep

Round 1: Knit to 3 stitches before instep, k2tog, k1. Work the next row of Chart B across instep. K1, ssk, knit to the end of the round. 2 sts decreased.

Round 2: Knit to instep. Work the next Row of Chart B across instep. Knit to the end of the round.

Repeat Round 1 and 2 until 40 sole stitches remain; a total of 80 stitches.

Foot

Work Round 2 until 2 ½” short of desired length. Try to end on Row 1, 13, 19 or 31 of Chart B. (Shown ending on Row 19).

Toe

Round 1: Knit to 3 stitches before instep, k2tog, k2, ssk, knit to 3 sts before the end of the instep, k2tog, k2, ssk, knit to the end of the round. 4 sts decreased.

Round 2: Knit.

Repeat Round 1 and 2 until 20 sts remain.

Graft remaining sts together using Kitchener Stitch. Weave in ends, make another one, and wear around proudly!


Please Note: I post my patterns as soon as I’ve completed them because I’m excited to share them with you. They have not been fully tested. But they are free. I’ve made every effort to make sure that the instructions are clear and error-free. There may be typos or pattern mistakes and if you find them or have any questions, please let me know by posting a comment or emailing me, dailyskein at gmail.com.


Creative Commons License
This work by Cailyn Meyer is licensed under a Creative Commons Attribution-Noncommercial-Share Alike 3.0 United States License.


Twisted Stitches July 18, 2008

Filed under: Musings — Cailyn @ 9:48 pm
Tags: , , ,

I spent all yesterday (minus the time for a bike ride, grocery store, laundry… you get the picture) in a marathon knitting session to get my latest sock finished. I got mostly there. I finished up the toe this morning… and then waited around anxiously, looking for the perfect lighting to take pictures outside. There was some stunning sunshine yesterday around 3 o’clock, but of course the sock wasn’t finished yet. In accordance with MLA (Murphey’s Law Association) guidelines, it was overcast all day today and the promised sunshine never appeared. But here’s what I managed to get:

Knit with Knit Picks Essential, in Mermaid. I’ve named them Danube, after the river that runs through Vienna, Austria. I took a river cruise down the Danube when I was in high school, and it was magical. The socks are my attempt to design a traditional Austrian twisted stitch sock. I haven’t been able to find much information on the traditional sock design, just a few sentences in Folk Socks by Nancy Bush and Eunny Jang’s blog, so these might not be entirely traditional. My grandmother is from Vienna and she wants to take me and my sisters there again, so maybe I’ll scour the city for knitting books if that happens.

I’ll have lots more details later, as well as more pictures, and of course a pattern eventually.  Now, we’re off to see a midnight IMax showing of the Dark Knight!  I’m excited, I haven’t seen an IMax movie since I was in school.


Chainmaille Pt 1 July 15, 2008

Filed under: Chainmaille Tutorials — Cailyn @ 4:04 pm
Tags: , ,

At the end of July, I’m teaching 6 chainmaille classes at a Girl Scout summer camp. I did this last year and it was tons of fun. Whenever I teach a class, I write up a handout with pictures and instructions so that the students can make more at home. I have to take some time to make new handouts for the new classes in a few weeks, but I thought I would publish my popular handouts on the blog here. Chainmaille is a lot of fun and there’s nothing like the compliments you get when wearing chainmaille jewelry! I love that the delicate pieces of silver jewelry I make have a link (forgive the pun) to the armor that protected knights and others for thousands of years.

First, a little background information about chainmaille. The art of chainmaille is based on the original armour-making techniques of linking separate rings together to create a “fabric.” Chainmaille (or mail as it was known then) was invented some time in the middle of the 1st millennium BC, but the earliest piece found is from the 4th century BC. Chainmaille was great for protecting against slashing and piercing weapons, which caused deadly infections, but didn’t help against crushing or bruising. Both Europe and Asia had chainmaille which was likely developed independently. European chainmaille was used to create whole shirts (hauberks) and head protection (coifs) and was made with riveted iron rings. Asian chainmaille was made from smaller rings that weren’t welded or riveted and the chainmaille was used to cover small vulnerable areas in their armour like the underarm. Asian chainmaille was often sewn to a fabric or leather backing, sometimes completely concealed between layers.

Artists have been adapting and creating new chainmaille for years. Just as embroidery has different stitches and knitting has cables and lace, chainmaille has “weaves.” These weaves fall into “families” based on their general method of construction.

This first picture is Byzantine, a very popular weave in the European family. The second picture is Oriental 4-in-1, from the Oriental family. You can see how distinct they look. They’re woven in very different ways.

To make chainmaille, you need two pairs of piers. Most chainmaillers use needle nose or chain nose, but I like to use a pair of bent nose pliers and a pair of flat nose pliers. Pliers without teeth are best if you’re going to be making silver or gold jewelry (the bracelets above are made with silver, niobium, and titanium). You’ll hold a pair in each hand, using them to open and close jump rings by twisting them towards and away from you. (Never pull jump rings from side to side! It’ll weaken the metal and mess up the shape of the ring.)

The jump rings can be made by hand by wrapping wire around a dowel to get a coil, then cutting the coil with snips or a jeweler’s saw to get individual rings. Or, my favorite method, save yourself the hassle and let a machine do all that coiling and cutting for you! Trust me, it takes forever to get enough rings for a large project like a necklace. Some of my favorite jump ring suppliers are the Ring Lord (great prices and variety, but terrible shipping time) and Spiderchain, a very talented chainmaille artist and of course, Etsy.

Chainmaille rings are named using the gauge of the wire used and the diameter of the dowel used to make the rings. For example, if I were to wrap a 20ga wire around a 1/8″ dowel rod, I would have a 20ga 1/8″ ring. Some ring sizes are better than others for certain weaves, like suggested needle sizes for knitting. You don’t want to knit fingering weight with size 7 needles (most of the time) and you don’t want to make a Byzantine weave with 18ga 1/8″ rings. Unlike knitting, though, where you can still knit with non-recommended needles, if you have a ring that is too small the weave will just not work. You just won’t be able to fit all the rings together. Most weaves have an “aspect ratio” that works best. The aspect ratio of a ring is the mm or inch measurement of the ring’s inner diameter (the space inside the ring) divided by the width of the wire (the mm or inch measurement, not the gauge). This is a great article about the effect of aspect ratio (or AR) on chainmaille: Aspect Ratio on Maille Artisans.

Now that we’ve got the preliminaries out of the way, on to the actual tutorial. This one is for the Byzantine weave, one of my favorites.

Byzantine Chainmaille Tutorial

The PDF file includes suggested ring sizes, pictures, and written instructions. Keep in mind that the PDF was originally written to be used in a class (I’m editing it to be more stand-alone, but who knows when that’ll be done) – if you have questions, I’m happy to answer them! Or, if you’d like to find out more about chainmaille on your own, I highly recommend browing around Maille Artisans, Phong’s Tutorials, or the Ring Lord’s Forums. Be warned, though: Chainmaille is highly addictive! Ring stashes can be easier to store than yarn stashes but much harder to forgive when they fall out of the closet onto your head.