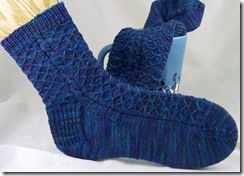
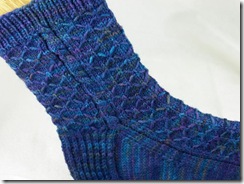
I designed and knit these socks as a gift for my mother-in-law for Christmas. Believe it or not, these socks are the first socks I’ve ever knit for someone else! Not many people are clamoring for hand-knit socks these days, which I think is a shame, but it does mean that I have more for myself. I know that the stitch pattern I used is named “quilted stockinette,” but the pattern really reminds me of a crystal structure instead.
These socks are great for hand-painted yarns. The quilted/crystal pattern breaks up the pooling that hand-painted yarns have a tendency to do. The quilted pattern is also simple to work and easy to memorize, with every other row being plain knitting. The pattern is created by slipping stitches with the yarn held in front, in order to create a loose strand across the front of the work which is then lifted up by knitting it together with a stitch in a later row. The cables add some visual interest along the leg, but really they’re just there because I love cables.
The quilted stockinette sections and cables are worked at the same time, but the number of rows in each are not the same. This means that the quilted pattern starts over before the cable does. Work the first round of each element, then the next round of each, and so on, so that you might be working Round 3 of the quilted stockinette but Round 5 of the cable at the same time. Keep an even (maybe slightly loose) tension with the yarn across the slipped stitches; pulling them too tight will cause the fabric to pucker. Because slipped stitches are shorter than knit stitches, the instep of the sock will be shorter than the sole. This is corrected somewhat by adding an extra row at the toe to the instep, but will mostly be unnoticeable when the sock is worn.
These socks were knit with two circular needles, but the pattern is written to be non-needle-specific. The pattern does not tell you how many stitches to put on each needle or have instructions such as “work to the end of Needle 1.”
Edit 1/14/08: Edited the cable instructions to make them easier (I hope) to follow. Instead of being part of the written instructions, the purl stitches are part of the cable charts. Also corrected the first round after the ribbing.
Crystalline Socks
Download the PDF: Crystalline Socks
- Finished Size: Foot length 9″, circumference 8.5″
- Needles: Size 1 (2.25mm) DPNS or circular(s)
- Yarn: Dream in Color Smooshy, Deep Sea Flower
- Yardage: 280-300 yards
- Gauge: 34 sts x 52 rows = 4″ in Quilted Stockinette
- Extras: Cable needle, stitch markers, stitch holder, tapestry needle
Special Stitches
Sl wyif: Slip stitch purlwise with yarn held in front of work, leaving a strand across the front.
Q1: Quilt 1; insert right needle into loose strand two rows below and knit together with next stitch
Quilted Stockinette:
Round 1: K2, *sl5 wyif, k1,* end k1.
Rounds 2, 4, 6, 8: Knit.
Round 3: K4, *Q1, k5,* to last 5 sts, Q1, k4.
Round 5: K1, sl 3 wyif, *k1, sl 5 wyif,* to last 5 sts, k1, sl 3 wyif, k1.
Round 7: K1, *Q1, k5,* to last 2 sts, Q1, k1.
Cable (click thumbnail to enlarge chart)
C4F: Slip next two stitches onto the cable needle and hold to the front of the work. Knit the next two stitches, then the stitches from the cable needle.
C4B: Slip next two stitches onto the cable needle and hold to the back of the work. Knit the next two stitches, then the stitches from the cable needle.
Cuff
CO 66 stitches and join to begin working in the round, being careful not to twist. Place a marker for the beginning of the round.
Ribbing: *K1, p1* to the end of the round. Work for Ribbing for 1″.
Leg
Set up round: K27, p1, k4, p1, k27, p1, k4, p1.
Starting on Round 1 of both the Quilted Stockinette and Cables A and B, work 27 sts in Quilted Stockinette, p1, Cable A, 27 sts in Quilted Stockinette, Cable B.
Continue working the Quilted Stockinette and the two cables at the same time until the leg is the desired length.
Heel Flap
Set up: Work next round as normal, stopping 3 sts before the end of the round, turn.
Row 1: Sl 1, p2tog, p30, turn. 32 sts on heel flap.
Heel flap will be worked back and forth on these 32 heel stitches. Put other 33 stitches on a stitch holder, spare needle, or scrap yarn.
Row 2: *Sl 1, k1* to the end of the row, turn.
Row 3: Sl 1, purl to the end of the row, turn.
Repeat Rows 2 and 3 30 more times, for a total of 34 rows (17 slipped stitches on each side) ending after row 3.
Heel Turn
Row 1: Sl 1, k17, ssk, k1, turn.
Row 2: Sl 1, p5, p2tog, p1, turn.
Row 3: Sl 1, k6, ssk, k1, turn.
Row 4: Sl 1, p7, p2tog, p1, turn.
Continue working 1 more stitch per row, until all stitches have been worked, ending after a WS row. 19 sts remain.
Sl 1 and knit across the heel. Return other 33 stitches, which form the instep, to the needle(s).
Gusset
Pick up and knit 17 stitches along the heel flap, 1 in each slipped stitch. Instep: k2, p1, work 27 sts in Quilted Stockinette, p1, k2. Pick up and knit 17 sts along in the heel flap, k9. Place marker to mark the beginning of the round. 34 sts increased, 86 sts.
Round 1: Knit to the last 3 sts before the instep, k2tog, k1, work across instep (k2, p1, work 27 sts in Quilted Stockinette, p1, k2), k1, ssk, work to the end of the round. 2 sts decreased.
Round 2: Work even, working instep pattern as established.
Repeat Rounds 1 and 2 until there are 66 sts remaining.
Foot
Continue working instep as established and work sole in stockinette stitch until foot is about 1.5 inches shorter than desired length.
Toe
Set up: Work to instep, knit across instep, place marker for the new beginning of the round.
Round 1: K1, ssk, k to 3 sts before the end of the sole, k2tog, k2, ssk, k to 3 sts before the end of the instep, k2tog, k1. 4 sts decreased.
Round 2: Knit.
Repeat Rounds 1 and 2 until there are 22 sts remaining.
Graft the remaining sts together using Kitchener stitch.
Weave in all ends and block if desired.
Please Note: I post my patterns as soon as I’ve completed them because I’m excited to share them with you. They have not been fully tested. But they are free. I’ve made every effort to make sure that the instructions are clear and error-free. There may be typos or pattern mistakes and if you find them or have any questions, please let me know by posting a comment or emailing me, dailyskein at gmail.com.

This work by Cailyn Meyer is licensed under a Creative Commons Attribution-Noncommercial-Share Alike 3.0 United States License.


They’re beautiful! Your mother in law must be thrilled!
Those are nice. I really like the cable down the side. Are those going to be available through ravelry at all? Printing is always easier in PDF form. ;0)
I’m still trying to find the perfect program for getting my patterns into PDFs, but it’s something I’m working on! So far all the ones I’ve tried have made very ugly pages.
Wow, they’re so beautiful!
Thank you for this wonderful pattern!
Lucy
beautiful socks. Thanks for posting the pattern, I have the perfect yarn and love the detail of the cable up the side!
How pretty. The yarn works so well with the pattern. Thanks very much. (The PDF looks good too.)
[…] Crystalline Socks […]
[…] That’s how Crystalline […]
[…] up the pattern, and who wants to do that if they don’t really believe in the project? The Crystalline Socks and Emily’s Scarf fit the bill […]